Bridge A Wired Ethernet Network Wirelessly Using Two Cisco WAP4410N Access Points
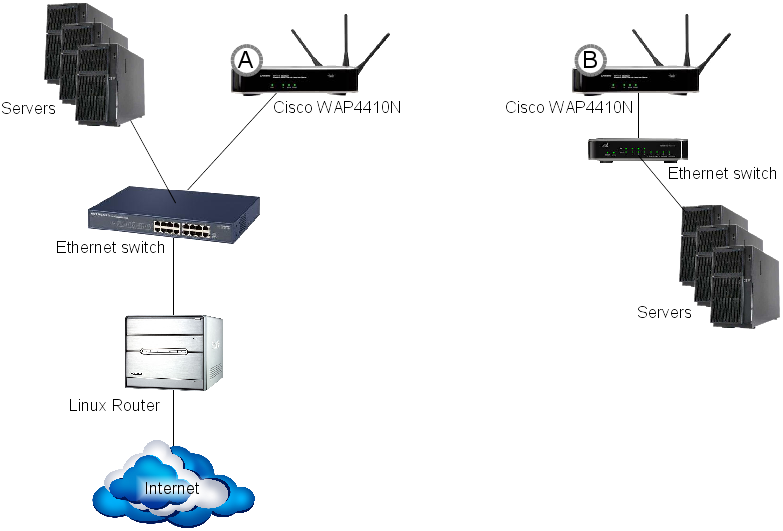
I needed to extend my ethernet (wired) network into another room of my home. I already had an ethernet switch in one room, connected to the internet through a router, with a WAP4410N wireless access point providing wireless service throughout the house. This network is what's shown on the left-hand side of the diagram below.
I added a second Cisco WAP4410N and an ethernet switch in the new location, labelled "B" in the diagram above, and connected the two WAP4410N access points together via WDS bridging. Now, any devices connected to the new ethernet switch are connected to my ethernet subnet just as they would be if they had been plugged into my original switch.
The WAP4410N labelled as "A" still functions as the wireless access point for the house, The one labelled as "B" does not accept connections from wireless devices.
Configuration:
- For initial configuration you plug a PC directly into the ethernet jack of WAP4410N "B" to access its admin console. The PC must be configured with a static address in the same ethernet subnet as WAP4410N "B". A factory default WAP4410N uses 192.168.1.245 as its IP address so the PC must be set with a different address in the 192.168.1.x subnet. Use 255.255.255.0 as the netmask, the default router and nameserver address settings are irrelevant. Once set, you should be able to access the WAP4410N admin console at http://192.168.1.254 with the userid "admin" and password "admin".
- Make certain that both WAP4410N devices are using the same version of firmware. As of this writing v2.0.6.1 is available but it did not work for me. My first generation iPad could not connect to my wireless network after WAP4410N "A" was upgraded to v2.0.6.1. I reverted to the v2.0.3.3 that it had previously been running and installed that on WAP4410N "B" as well. WAP4410N firmware link
- The configuration of WAP4410N "A" has to be changed to allow the new WAP4410N to connect to it. Go to the AP Mode tab and check "Allow wireless signal to be repeated by a repeater". Enter the MAC address of the wireless interface in WAP4410N "B". Find that MAC address on the Status -> Wireless page.
- WAP4410N "B" should be configured identically to WAP4410N "A" on all of the pages within the Setup and Wireless tabs except for the IP address and hostname of each WAP4410N on the "Basic Setup" page. These should be unique. In my case this simply meant configuring my DHCP and DNS servers to handle the new WAP4410N and setting the hostname field in WAP4410N "B" accordingly. The MAC address for the ethernet interface is listed on the Status -> Local Network page.
- On the AP Mode tab of WAP4410N "B" select "Wireless WDS Bridge" and enter the MAC address of the wireless interface on WAP4410N "A".
- Set an administration userid and password on the Administration -> Management page.
- Reboot both WAP4410N devices. From here on you use the IP address you assigned to WAP4410N "B" in order to connect to the admin console. Also the new admin userid and password that you assigned.
- You can test connectivity using the PC that you have plugged into the back of WAP4410N "B". If you modify its network configuration to what it would be if the PC was plugged directly into the original ethernet switch, then it should get a connection and function normally. In my case that simply means setting the PC to get its ethernet configuration via DHCP. It may take a few minutes for connectivity to be established, or you may need to reboot the PC, but it should work, assuming you've done everything else properly.
- Once your connectivity test is complete, you can remove the ethernet cable from the PC and connect the new ethernet switch to WAP4410N "B". Any devices that you connect to that switch will work exactly the same way as if you had plugged them into your original ethernet switch.
